基于 Vuforia 的 AR 红绿灯项目:客户端 TCP 通信实现 项目简介 本项目是一个基于 Vuforia 的增强现实(AR)应用,旨在将服务端红绿灯的控制与显示进行 AR 化。通过集成 Vuforia SDK,用户可以将虚拟红绿灯叠加在现实世界的场景中。此外,本项目还实现了客户端与服务器之间的 TCP 双向通信,允许用户通过客户端控制真实或虚拟红绿灯的状态,并实现状态同步。
项目功能
AR 红绿灯显示: 利用 Vuforia 的图像识别与追踪功能,在摄像头捕捉到的图像上叠加虚拟红绿灯模型。TCP 双向通信: 客户端(本项目)与服务器建立稳定的 TCP 连接,实现双向数据传输。红绿灯控制: 客户端可以向服务器发送控制指令,改变红绿灯的状态(如切换红绿灯、调整倒计时)。状态同步: 服务器接收到客户端的控制指令后,会更新红绿灯状态,并将更新后的状态信息发送回客户端,实现客户端与服务器之间的状态同步。多设备支持: 支持不同设备作为客户端,获取本机IP并显示。
核心技术
Vuforia Engine: 用于图像识别、追踪和 AR 内容渲染。
C# 脚本编程: 使用 Unity 引擎和 C# 脚本实现项目逻辑。
TCP/IP 协议: 实现客户端与服务器之间的网络通信。
多线程: 使用多线程处理网络连接、数据接收和发送,避免阻塞主线程。
视频演示
Your browser does not support the video tag.
Your browser does not support the video tag.
Your browser does not support the video tag.
代码实现(客户端TcpServer.cs) IP 地址获取 1 2 3 4 5 6 7 8 9 10 11 12 13 14 15 16 17 18 19 20 21 22 23 24 25 26 27 28 29 30 31 32 33 34 35 36 37 38 39 40 41 42 43 44 45 46 47 48 49 50 51 52 53 54 55 56 57 58 59 60 61 62 63 64 65 66 67 68 69 70 71 72 73 74 75 76 77 78 79 80 81 82 83 84 85 86 87 88 89 90 91 92 93 94 95 96 97 98 99 100 101 102 103 104 105 106 107 108 109 110 111 112 113 114 115 116 117 118 119 120 121 122 123 124 125 126 127 128 129 130 131 132 133 134 135 136 137 138 139 140 141 142 143 144 public string GetIOSIP ()string AddressIP = string .Empty;for (int i = 0 ; i < adapters.Length; i++)if (adapters[i].Supports(NetworkInterfaceComponent.IPv4))if (uniCast.Count > 0 )for (int j = 0 ; j < uniCast.Count; j++)if (uniCast[j].Address.AddressFamily == AddressFamily.InterNetwork)return AddressIP;public string GetIOSIP2 ()string AddressIP = string .Empty;#if UNITY_IPHONE foreach (NetworkInterface adapter in adapters)if (adapter.Supports(NetworkInterfaceComponent.IPv4))if (uniCast.Count > 0 )foreach (UnicastIPAddressInformation uni in uniCast)if (uni.Address.AddressFamily == AddressFamily.InterNetwork)#endif #if UNITY_STANDALONE_WIN foreach (IPAddress _IPAddress in Dns.GetHostEntry(Dns.GetHostName()).AddressList)if (_IPAddress.AddressFamily.ToString() == "InterNetwork" )#endif return AddressIP;public string GetIOSIP3 ()string ipAddress = "" ;foreach (IPAddress ip in host.AddressList)if (ip.AddressFamily == AddressFamily.InterNetwork)break ;return ipAddress;public static string GetAndIPv4 ()string ipAddress = "" ;try foreach (IPAddress ip in host.AddressList)if (ip.AddressFamily == AddressFamily.InterNetwork)break ;catch (Exception e)"IP 获取失败" );return ipAddress;public static string GetPCIP ()try string HostName = Dns.GetHostName(); for (int i = 0 ; i < IpEntry.AddressList.Length; i++)if (IpEntry.AddressList[i].AddressFamily == AddressFamily.InterNetwork)return IpEntry.AddressList[i].ToString();return "noIp" ;catch "ipGetFailed" );return ("ipGetFailed" );
TCP 连接 1 2 3 4 5 6 7 8 9 10 11 12 13 14 15 16 17 18 19 20 21 22 23 24 25 26 27 28 29 30 31 32 33 34 35 36 37 38 39 40 41 42 43 44 45 46 47 48 49 50 51 52 53 54 55 56 57 58 59 60 61 62 private void Connect ()try int _port = Convert.ToInt32(inputPort); string _ip = inputIp; " ip 地址是 :" + _ip);" 端口号是 :" + _port);true ; new Socket(AddressFamily.InterNetwork, SocketType.Stream, ProtocolType.Tcp);new IPEndPoint(ip, _port); "监听成功!" );10 ); new Thread(Listen);true ;catch { }void Listen (object otry as Socket;while (true )":" + "连接成功!" );new Thread(Received); true ;new Thread(SendMessage); true ;catch { }
数据接收 1 2 3 4 5 6 7 8 9 10 11 12 13 14 15 16 17 18 19 20 21 22 23 24 25 26 27 28 29 30 31 32 33 void Received (object otry as Socket;while (true )1 );byte [] messageBytes = new byte [1024 ];int len = socketSend.Receive(messageBytes); if (len == 0 )break ;string str = Encoding.UTF8.GetString(messageBytes, 0 , len);"接收到的消息:" + socketSend.RemoteEndPoint + ":" + str);true ;"接收数据次数:" + recTimes);catch { }
Received(object o): 在新线程中循环接收客户端发送的数据。接收到的数据存储在 messageBytes 字节数组中,然后使用 Encoding.UTF8.GetString() 方法将其转换为字符串。
Update(): 在主线程中,如果检测到 getNew 标志为 true(表示接收到新数据),则解析接收到的消息,并根据消息类型执行相应的操作(如设置红绿灯、切换红绿灯、停止设置等)。
数据发送 1 2 3 4 5 6 7 8 9 10 11 12 13 14 15 16 17 18 19 20 21 22 23 24 25 26 void SendMessage (object otry as Socket;while (true )if (isSendData)false ;byte [] sendByte = Encoding.UTF8.GetBytes(inputMessage);"发送的数据为 :" + inputMessage);"发送的数据字节长度 :" + sendByte.Length);catch { }
SendMessage(object o): 在新线程中循环检测 isSendData 标志,如果为 true,则将 inputMessage 字符串转换为字节数组,并发送给客户端。
资源释放 1 2 3 4 5 6 7 8 9 10 11 12 13 14 15 16 17 18 19 20 21 22 23 24 private void OnDisable ()"begin OnDisable()" );if (ifConnect)try catch (Exception e)"end OnDisable()" );
OnDisable(): 当脚本被禁用或销毁时,关闭 Socket 连接并释放资源。
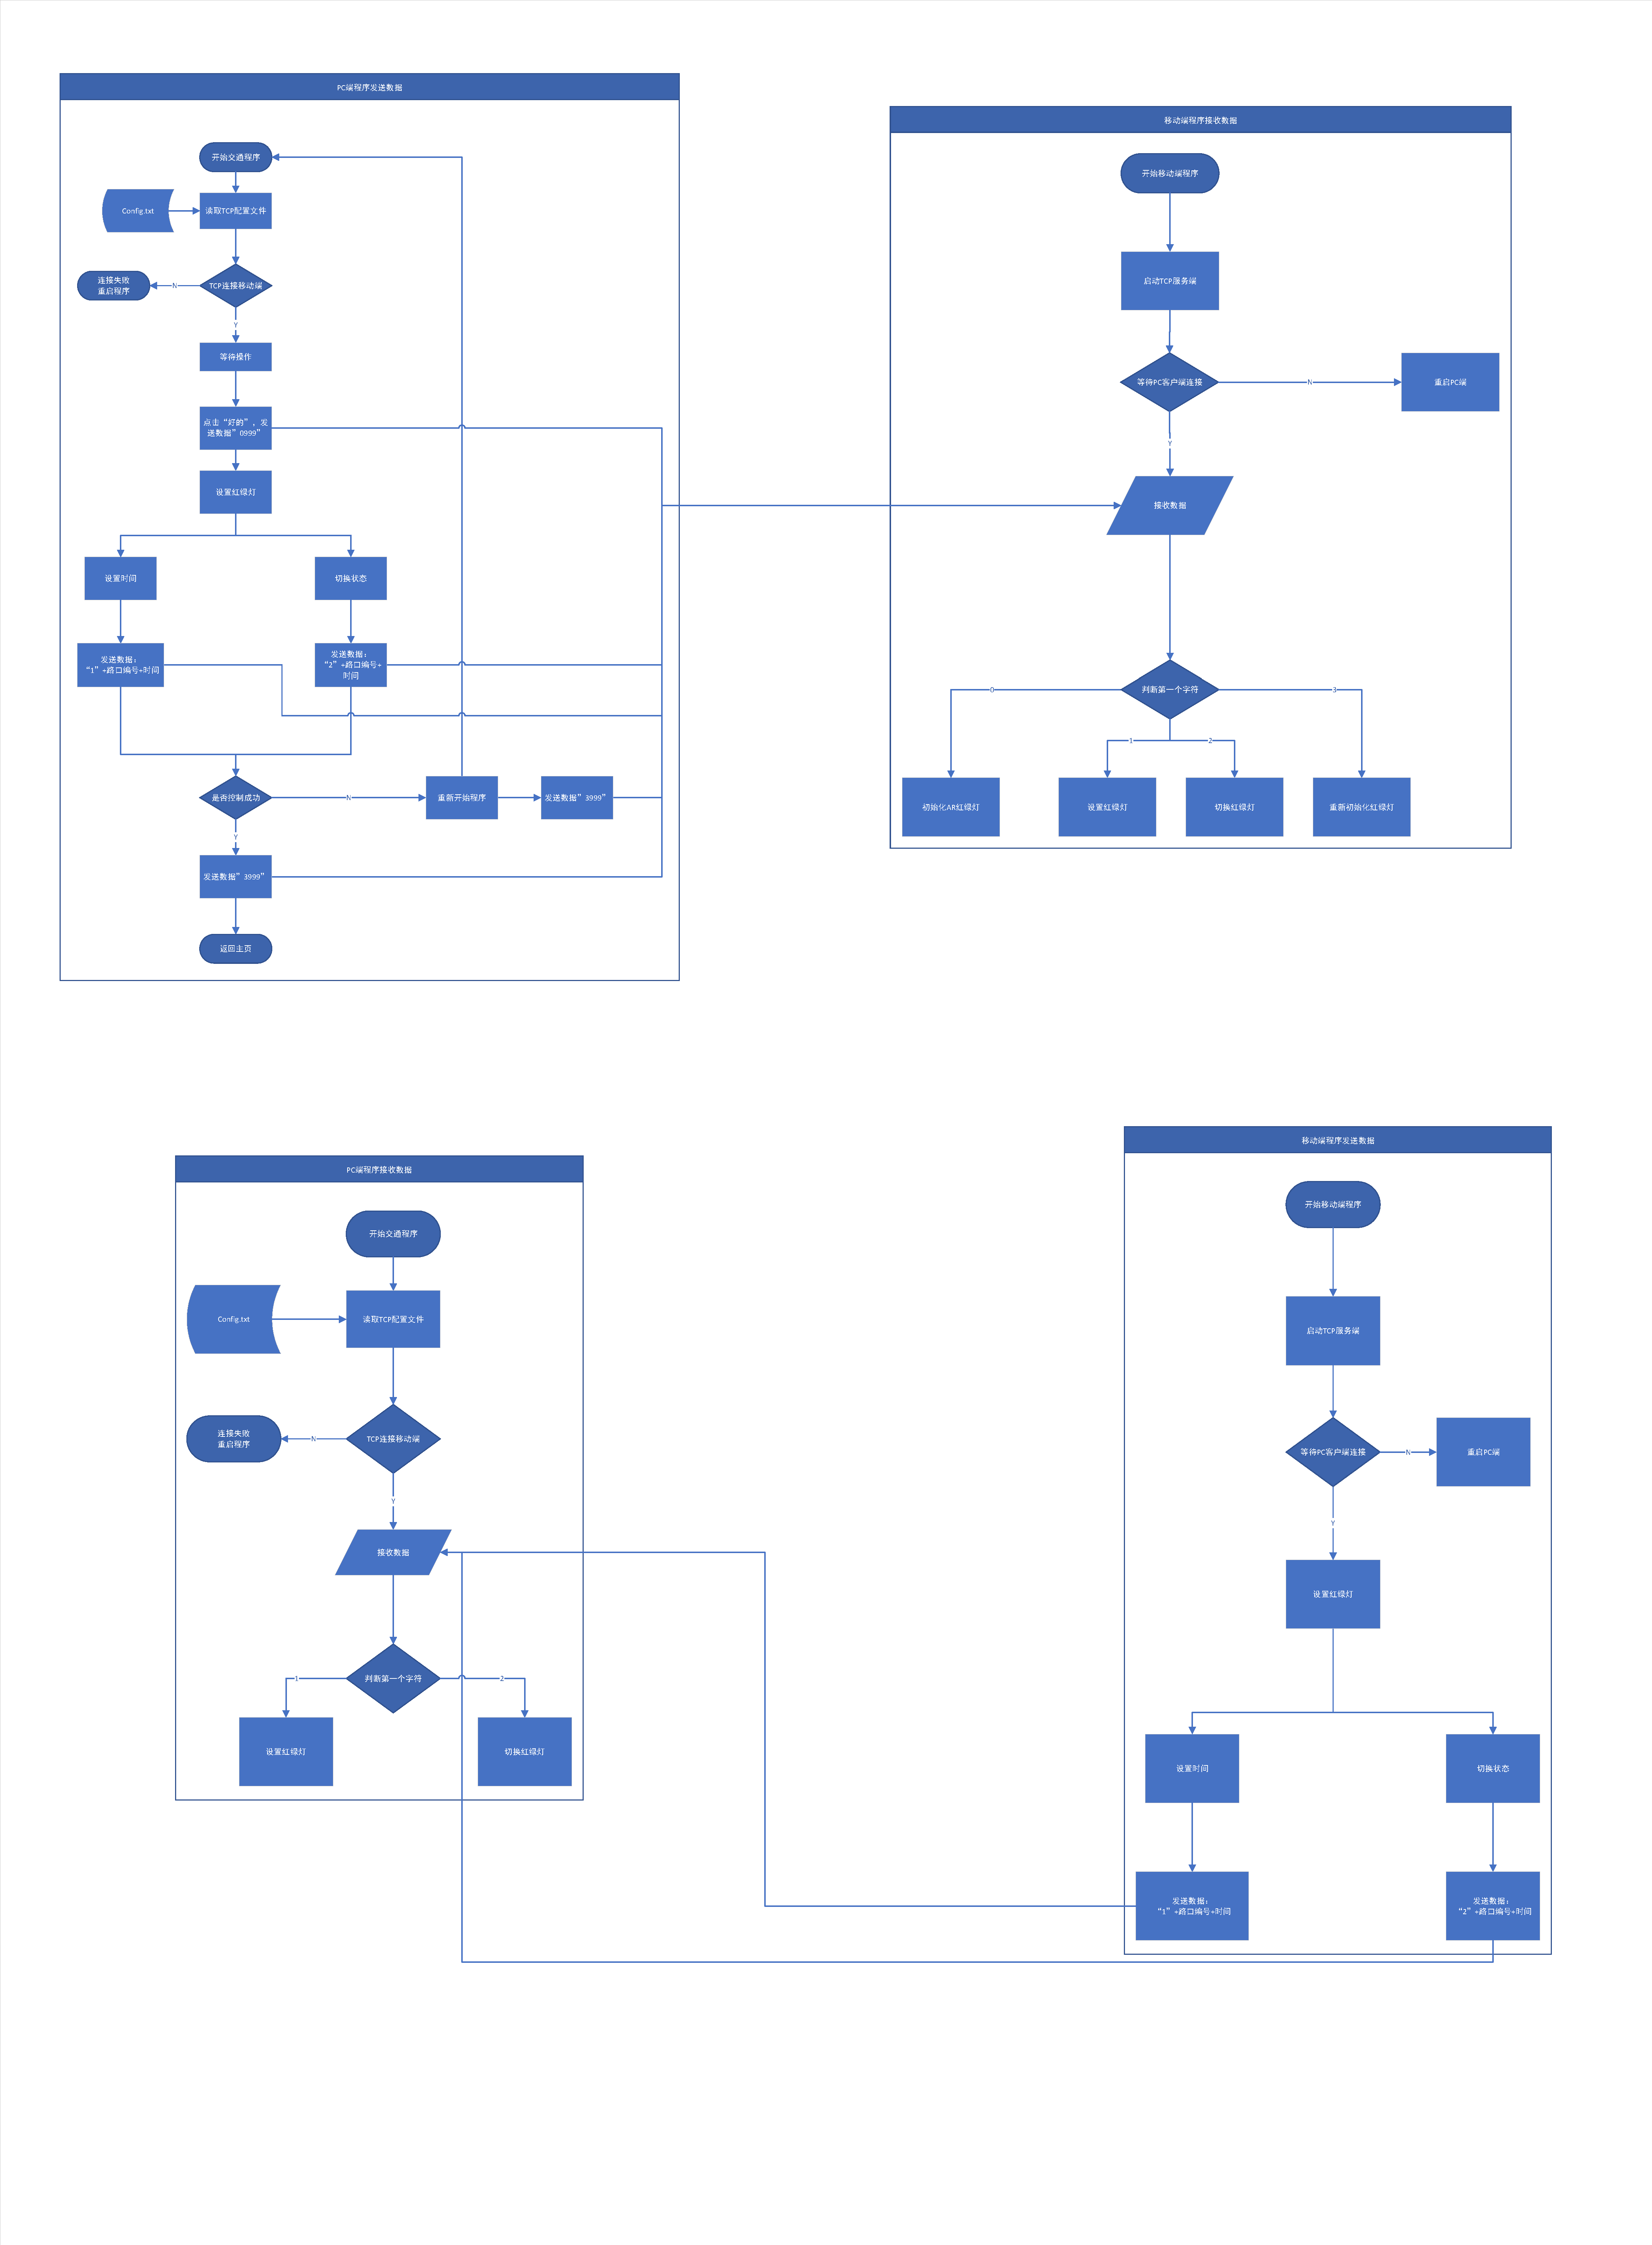
逻辑图
注意 本篇推文主要关注客户端 (TcpServer.cs) 的代码实现,由于该项目是服务端项目 中的子部分,故服务端暂不开源。详情请查看本项目仓库Zhou1317fe5/Vuforia_ARTrafficLight